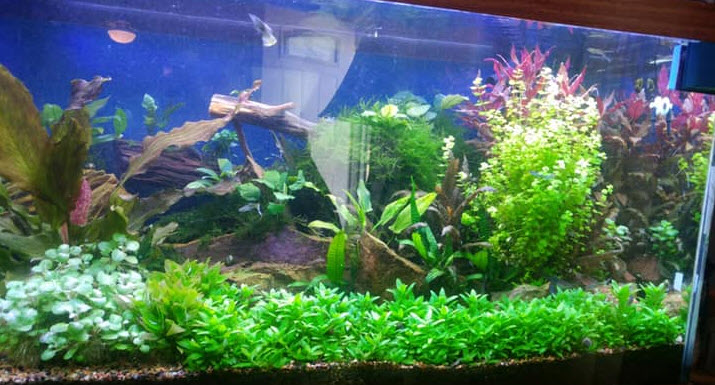
This article is about a type of planted aquarium where the “low tech” CO₂ system is to obtain the CO₂ from wood pellets buried in the substrate rather than getting the CO₂ from some CO₂ gas system. The system uses chemical fertilization. So this is sort of a “hybrid” between low tech and high tech planted aquarium systems. These are its TYPICAL characteristics.
| Hybrid | |
|---|---|
| Planten | Elke |
| Bemesting | Lichte bemesting |
| Onderste substraat | 1 inch (2,5 cm) houtpellets |
| Afdekkende substraat | 1 inch (2,5 cm) grof zand |
| Kooldioxide | Van de pellets |
| Verlichting | Matig 4-4-4-4-4-4 |
| Filter | Groot |
| Beluchting | Geen |
| Waterbeweging | Beetje laag in de tank |
| Aantal vissen | Licht |
| Inoculeren | Vijver modder |
| Moeilijkheid | Matig |
The “Hybrid Method” is named from the fact it incorporates certain elements of both the Walstad planted aquarium and the high tech planted aquarium. Note this is ONLY a TYPICAL set up. None of these parameters are cast in stone. They can all be changed with success.
Now a follower of Walstad will say the hybrid method is “unnatural” and thus is somehow “bad”. It uses “horrible chemicals” which won’t work because they are not “natural”. And the “aquascaping” followers of the high-tech EI method will chuckle at how “naïve” this approach is. But note it works.
Then there are some who read my articles on the carbon to nitrogen ratio and ask why the cellulose pellets will not produce a huge amount of biofloc and plug everything up. Good question! The answer lies in the fact that cellulose is VERY difficult for protozoans to break down. Indeed, there are many scholars who say the hot climate and coal produced in prehistoric times wouldn’t have occurred except for the fact that organisms which VERY slowly break down cellulose hadn’t yet come on the scene.
Both Walstad (low nitrogen substrate) and Father Fish (high nitrogen substrate) bury this cellulose and have GREAT tanks. I’ve got a relatively new tank(six months) with wood pellets and it is doing just great. The slow speed of the breakdown of cellulose is confirmed simply by the number of pieces of driftwood which have survived many years in tanks with very high nitrates. Cellulose is just VERY resistant to decomposition.

Hybrid Planted Aquarium in More Detail
I’ll make some recommendations for the “hybrid” planted aquarium system here with the caveat that this is just what I recommend. It is NOT “required” in any way. One can do exactly the opposite of these recommendations and be successful. Mother Nature is very flexible.
I recommend a “hybrid” planted aquarium that has the following characteristics:
- Lower layer of substrate: 1 inch (2,5 cm) wood pellets fortified with phosphate and iron
- Cap: 1 inch (2,5 cm) coarse sand/small gravel mix, tan, light brown, medium brown, black all mixed together. 1240 or 1040 Black Diamond blasting media also works well either alone or as part of the mix.
- Fertilization in water column: light with homemade ammonium nitrogen and potassium fertilizer added daily with a dosing pump one hour before the light are timed to come on. Aim for a nitrate level of 20 ppm. If one has a high pH (8.0 or higher), switch out the ammonium fertilizer with a nitrate fertilizer.
- Fertilization in the wood pellet layer: light with homemade iron and phosphorus tabs
- Carbon Dioxide: No CO₂ injection, CO₂ comes only from wood substrate.
- Lights: LED lights at 30% for 4 hours on, 4 hours off, 4 hours on, 4 hours off, 4 hours on, 4 hours off
- Filtration: light on flow but heavy on biofiltration (tricky!)
- Aeration: none
- Water movement: Some only low in the tank, very little surface movement
- Fish: Small number of small fish under two inches (5 cm)
- An important addition is some sort of “inoculate”, a natural source of biodiversity in the substrate. I use pond mud.

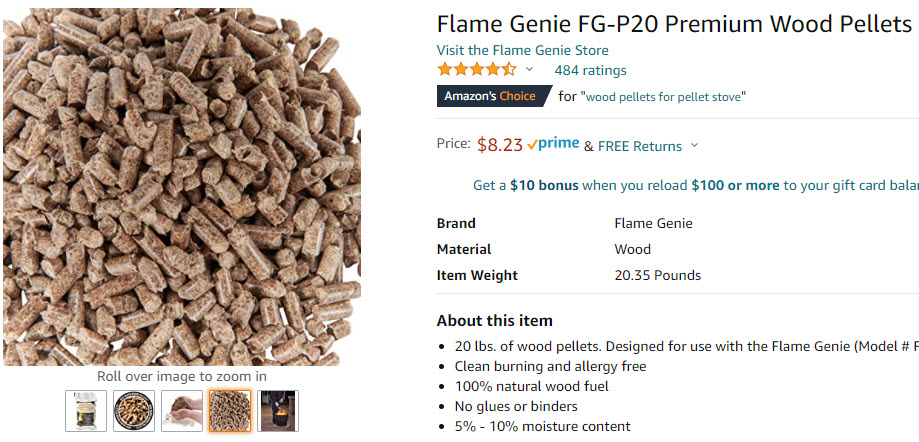
Start out with one inch (2.5cm) of wood pellets (the kind used for wood stoves). The pellets are pure compressed cellulose and will feed carbon dioxide to the aquarium for a long time. The wood pellets are so dense they sink and they will not float up in the aquarium.
The phosphate can be supplied by adding one half teaspoon “triple phosphate” per five pounds of wood pellets. Triple Phosphate (other names are “superphosphate”, “superphosphides” and calcium dihydrogen phosphate) is typically available from the internet. While the calcium hydrogen phosphates are preferred here, this can be any phosphate salt, including dipotassium phosphate, monoammonium phosphate and diammonium phosphate. Note these phosphates are difficult to find in some countries. Also note to avoid bone meal (apatite) as it doesn’t decompose very well in the aquarium.
The iron can be simply ferrous sulfate, pyrite or steel wool. Chelated iron from the garden store will also work well.

The inoculate is quite flexible. I like to use just a teaspoon or so of brown “gunk” and mud from the pond down the road, together with one teaspoon Black Kow cattle manure compost per five pounds of wood pellets. Soil from a potted plants or garden soil will also work well.
Add the inoculate and calcium phosphate to the wood pellets and mix. Put one inch into the aquarium dry. Wet the pellet mixture lightly with a spray bottle.

These wood pellets break apart rather rapidly in water into 1/8th inch (3mm) wood particles which stay on the bottom of the aquarium.
Then cover with one inch cap of the coarse sand and small aquarium gravel. I prefer several colors of aquarium sand and gravel sold in all fish stores (cream, tan, medium brown and dark brown sand all mixed together) mixed with the small “natural” aquarium gravel than is also several colors of brown all mixed together. I add some Black Diamond blasting sand to give some black coloration. Mixing all these colors and sizes gives the most natural bottom look that doesn’t show if the wood pellets come to the surface during re-arranging. Fish poop and dead leaves also blend in and typically can’t be seen.

Once everything is in place wet the sand with a spray bottle again. This keeps it in place during filling. Then slowly and carefully add the water without disturbing the substrate. I take a small cake pan and fill with water poured or hosed into the pan to overflow onto the dry substrate.
Once the aquarium is filled with water cover the aquarium with black plastic and let it sit idle with the filter running for six weeks with some food additions. This “maturation” time lets Mother Nature get everything settled in, so to speak. More can be found about this subject at this link:
2.15. indraaien met een beplant aquarium
In a well planted aquarium the biggest problem one will see is algae. Thriving vascular plants covering most of the aquarium are the best defense against algae. One never wants the algae in a planted tank to get ahead of the vascular plants. So it becomes important to get the vascular plants into the aquarium as early as possible. So go ahead and plant the tank after the six week “maturation” in the dark.

And be aware that a planted aquarium without CO₂ injection, typically needs to be taken very slow, with low light levels. By “low light levels” we mean both limited hours of lights on per day and low power grow lights or moderate power normal “white” lights not made for aquariums.
This would be like Aquarium LEDs (blue and crimson LEDS in the mix) on a 4-on/4-off/4-on/4-off/4-on/4-off at 30% power or a cheap white LED on the same schedule at 100% power. The four on and four off schedule maximizes the CO₂ utilization by the plants. Note one can also use the less light provided by 8-on/16-off, 4-on/4-off/4-on/12-off or 4-on/6-off/4-on/10-off light schedules. These are NOT “rules”.

The process that this planted aquarium technology depends on is simple. Nitrogen and oxygen diffuse down from the water column to the cellulose. Organisms then use the oxidation of cellulose to produce nitrogen containing proteins. The very slow oxidation of the cellulose creates carbon dioxide, which diffuse up into the water column.
The nitrogen is recycled hundreds if not thousands of times in the wood substrate, continuing to give off carbon dioxide till the wood supply runs out. In ten years or so when the wood runs out, the amount of organic material in the form of rotting roots into the substrate typically will continue to provide the carbon dioxide.
It is very important here that the capping layer be porous coarse sand, fine gravel or a mixture. If one uses fine sand like pool filter sand or some cheap play sand at a one inch depth SOMETIMES (again, this is NOT a “rule”) not enough oxygen will diffuse down and things can get pretty sour and smelly (Father Fish uses fine sand but has a three inch (7.5cm) cap). Use 100% porous 1/4 inch (6mm) aquarium gravel and the wood will decompose too fast, again creating some bad smells.

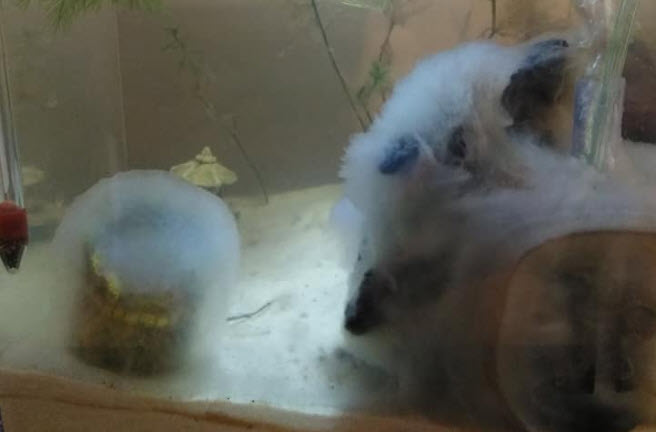
Note that it is quite normal to get a half inch white “beard” covering all the substrate in the aquarium. This can appear literally overnight and normally creates panic in the hobbyist. JUST IGNORE THE WHITE BEARD! It will go away in a few weeks. The white beard is simply a very fast growing organism called a water mold which feeds on some simple carbohydrates initially found in most wood.
There are a whole host of organisms which were introduced by the pond mud which eat this water mold and produce carbon dioxide. These organisms are much slower to reproduce than the water mold so they take some time to get going and eat the water mold. But if one just has patience the water mold will go away.
It is also common to get some pretty bad smells during the settling in period. Again, just ignore it and they will go away. For the first month or two it is always a good idea to add some more aeration than normal in order to prevent these smells and to hasten the decomposition of the water mold to carbon dioxide.

I use a large canister filter filled with foam, pot scrubbers or K1 media for a 110 gallon (416 liter) low tech planted aquarium. Outlet from the canister needs to be deep in the aquarium and NOT stir up the surface. I use baffles on the outlet to slow the flow into the aquarium. The baffles are simply a capped section of a pipe one inch large in diameter than the outlet pipe going into the aquarium from the filter. This produces a flow which has been turned around 180 degrees and spread out considerably.
I decidedly recommend against using air stone operated filters or hang on back filters in ANY planted aquarium. They give too much aeration. Small aquariums can use small in tank filters that are not air operated. For tanks under 75 gallons (284 liter) I heartily recommend pipe-under-sand filters and pipe-on-back-wall filters such as are found in this article:
8.7.8. Kleine doe-het-zelf filters
Note that in this type of hybrid planted aquarium large amounts of wood in the aquarium as decorations are actually beneficial as they add considerable carbon dioxide. The fertilizer level would need to be increased but that is easily calibrated. Ms. Walstad does not use wood decorations in her aquariums. But she is adding food as the fertilizer and is thus limited in how much fertilizer she can add. For several fertilizing methods for such a low tech planted tank see the “fertilizing” link below.

Low Tech CO₂ System for Aquariums
There is a low cost, low tech system which adds considerable CO₂ to an aquarium. This low tech system will be a very good addition to the hybrid system outlined above. The details of this system can be found at this link:
15.6.1 Low Tech CO₂ Aquarium System
Beplante aquaria in meer detail
De volgende paragrafen geven je enkele algemene richtlijnen voor de eenvoudigste manieren om een mooi beplant aquarium in te richten:
15.1. Beplante aquaria in meer detail
15.4. Soorten beplante aquaria
15.7. Substraten voor beplante aquaria
15.9. Hightech beplant aquarium
15.11. Veel vissen, veel planten


